UPDATE 2: Amazon broke it and a lot of other two word devices. Removing the space from “MyCar” works.
UPDATE: Amazon OR SmartThings BROKE virtual switch capability with the echo earlier this week. It shows up under discovered devices and just gives a failed tone when triggered. I have inquired about this and have not heard back yet.
The elusive Part 6 of my Amazon Echo car start series is finally here!
So here we are, you read through the first five posts and are thinking to yourself “Ok Jryan, how in the hell do I do this myself?! Simple directions please.”
A little demanding tone, but ok, I’ll oblige.
WARNING: THIS ONLY WORKS ON GM CARS! Don’t waste your time trying other cars unless you’re up to months of frustration figuring it out. It *may* work on others, but you WILL need to find out the can-bus to use, the can-bus entry point, and the commands to use and how to structure them.
Gather your materials
- Smart Things (No link, I will detail in another post eventually why I am no longer recommending the platform. That’s what I have currently setup in my home, but not for much longer. Summed up, it’s unreliable.)
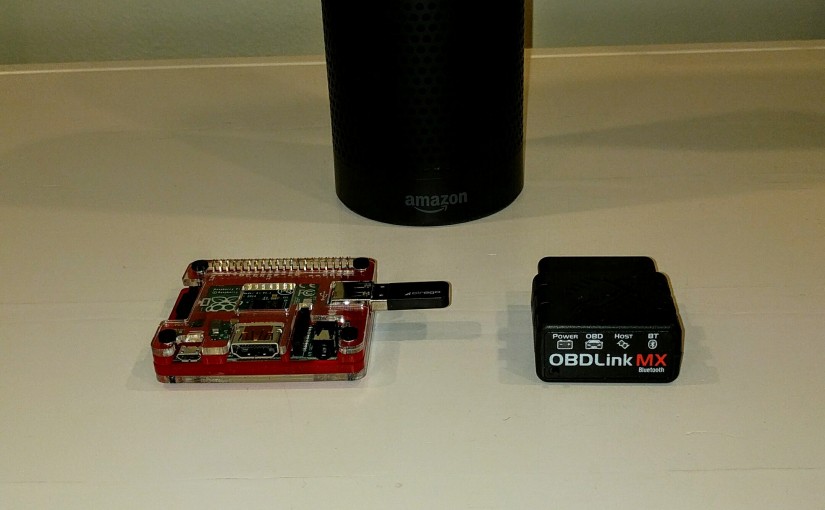
- Raspberry Pi Model A+
- Raspberry Pi Model A+ Case (The one I have is no longer made, you’re on your own here.)
- Sandisk SD Card
- Bluetooth/Wifi Dongle
- OBDLink MX Bluetooth
- Car Adapter
- A random generic USB hub, USB Keyboard/Mouse, HDMI Cable, MicroUSB wall adaptor, android tablet or phone. All of this is needed JUST for setup. If you are seriously reading this right now, setting this all up, I guarantee you have all of these things already.
NOTES:
- Vera, OpenHAB, HomeSeer will all work, but I am not outlining the directions here. Maybe later if I am asked for specifics on these systems.
- I suppose you could use a Rpi zero as well. I can’t tell you how it works though BECAUSE I CAN’T OBTAIN ONE! Also, steer clear of ALL OTHER MODELS of the Rpi, including the new Rpi 3, the power draw is too high for this project, among other issues you may have. If you aren’t going to attempt this until June, give the $9 C.H.I.P computer a try.
- The Cirago Bluetooth Wifi dongle I used is no longer available and I HAVE NOT personally tested the one I listed.
- Feel free to use whatever car adapter you’d like. Power issues are a bitch though. My Samsung fast charge car adapter has been great.
- WTF, root? Sudo for the web service? ARE YOU MAD?! Yeah, well, do whatever you’d like. This is not a device sitting on the public internet, you can only get to it from the local network. If you want to secure it even more Mr. (Or Mrs.?) Paranoid, be my guest.
Perform The Steps
- Head over to the Raspberry Pi site and download “Raspian Jessie Lite”.
- Image your SD card. Here, have some directions: https://www.raspberrypi.org/documentation/installation/installing-images/README.md
- Plug in the usb hub, wifi/bluetooth dongle, keyboard/mouse, the SD Card, HDMI cable and power.
- You should be loaded into the terminal on boot. The default username is “pi” and the default password is “raspberry”. (If you care to change the password, you can do so by typing “sudo raspi-config” and selecting option 2.)
- Setup Wifi
- Give your Raspberry Pi a static IP
- Enable SSH:
- Type sudo raspi-config
- Option 9
- Option A4
- Enable
- Ok
- Finish.
- Set the root password:
- sudo passwd root
- Allow root login on SSH:
- sudo nano /etc/ssh/sshd_config
- Change the line “PermitRootLogin” to “yes”
- Ctrl+o to save
- Ctrl+x to exit back to terminal
- Remove a few troublesome packages:
- sudo apt-get purge ifplugd avahi-daemon
- Update and Upgrade Raspbian
- sudo apt-get update && sudo apt-get upgrade
- Reboot the Rpi
- reboot
- Install a few needed packages:
- sudo apt-get install php5-common php5-cli php5-fpm nginx bluetooth python-serial minicom
- Add www-data to allowed sudoers.
- sudo nano /etc/sudoers
- Add the line below to the last line of the file. Save and exit.
- www-data ALL=(ALL) NOPASSWD: ALL
- Setup Nginx to use PHP
- sudo nano /etc/nginx/sites-available/default
- Find the section below and REMOVE the # signs so it looks as follows.
 # pass the PHP scripts to FastCGI server listening on 127.0.0.1:9000

#

location ~ \.php$ {

include snippets/fastcgi-php.conf;

#

# # With php5-cgi alone:

# fastcgi_pass 127.0.0.1:9000;

# With php5-fpm:

fastcgi_pass unix:/var/run/php5-fpm.sock;

}
- Save and Exit
- Downgrade the MX Bluetooth to V3 firmware. Ugh, what a wasteful step. We wouldn’t need to do this if OBDLink was a responsive company…
- Pair your MX Bluetooth with your phone.
- Plug it into your car, press the pair button, and you better know how to complete the pairing progress on your phone/tablet.
- Now that you have it paired, go to the Play Store and download “OBDLink”
- Open OBDLink
- Select “Settings”
- “Communications”
- Select “Bluetooth Device” and select whatever name the MX Bluetooth paired as.
- Select “Firmware Updates”
- Select the version 3 firmware, and downgrade it. Why? Because it’s way more stable than version 4 for this purpose.
- When the upgrade is finished, unpair it from your phone and reset it to factory settings (Hold the button down until you see the light start rapidly flashing on the MX)
- Pair your MX Bluetooth with your phone.
- Here’s the step where ssh is going to come in handy. Plug just the usb wifi/bluetooth adapter into the Pi, hook it up to your car’s power, and bring a laptop to SSH into it.
- Pair the MX Bluetooth to your Raspberry Pi
- Plug the MX Bluetooth into your car
- bluetoothctl
- scan on
- Press the pairing button on your MX Bluetooth
- It will pop up, copy the mac address.
- pairable on
- pair MACADDRESS_GOES_HERE
- trust MACADDRESS_GOES_HERE
- scan off
- exit
- sdptool add SP
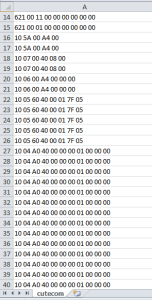
- At this point, it would be a good time to find your keyfob lock code. Go back and read. I get into this. EXCEPT, you will be using Minicom instead of Cutecom because there is no GUI with Jessie Lite and I do not recommend you install one.
- Install some files from Github. You can WGET or send them over with SSH (you may have set it up earlier). https://github.com/jryanishere/GM-Car-Automation
- Place keyfob.php in “/var/www/html”
- Place keyfob.py in “/var/www/html/cgi-script”
- Edit keyfob.py
- nano /var/www/html/cgi-script/keyfob.py
- Insert the first two digits on line 58 and the next 6 digits on line 61. (Hopefully the rest of the command will line up and everything will work.)
- Time to test.
- In a browser on your computer, navigate to “http://RASPBERRY_PI_IP/keyfob.php?command=lock”
- Did your car lock? Yes? Go to step 22.
- Get SmartThings configured
- Make a developer account if you don’t already have one.
- https://graph.api.smartthings.com/
- Login
- Click “My Device Handlers”
- Click “Create new device handler”
- Click “From Code”
- Copy and paste the contents of the “SmartThings Device Handler” from my Github
- On line 43 and 49, update the ip address to your ip address. You’ll notice a hex code after the IP. You’ll need to change this as well. It is a converted version of your IP address. You can convert it here: http://www.miniwebtool.com/ip-address-to-hex-converter/
- Click Create
- Click “Publish” then “For me”
- Click “My Devices”
- Click “+New Device”
- Name it “My Car”
- Make the Network Id “CarStart”
- Select your hub
- Select the type, at the bottom of the list select “On/Off Button Tile”
- Create
- Now that you have your new device in SmartThings, you can now re-add your SmartThings account in your Amazon Alexa app, select your new device, and discover new devices.
- “Alexa, turn on my car”